Five years ago this summer, we made our second excursion to Nauvoo, Farr West, Adam-ondi-Ahman, and Jamesport.
It was a great experience for so many reasons but one was our purchase of some furniture from a cute Amish gentleman, in Jamesport, named Jake Graber, owner of JAM Wood Products. He and his family handcraft
BEAUTIFUL furniture, backyard toys, patio furniture, etc. We fell in love with his cedar glider rockers and bought two.
 |
We only bought the chair...
wish we had the footstools! |
It was quite an adventure trying to fit two huge chairs in our trailer...Bob unassembled them as much as he could and then we'd put them on the bed, couch, chair, walkway down the center, etc. When we'd stop to camp, out they'd come so we could sleep. It was pretty comical.
Anyway, the first couple of years we had them, we stained them but they really took a beating in the weather.
Then, two years ago, Bob, Sammi, Maddi, and I had the opportunity to take another trip back to St. Louis to "Sheepalooza"...a sheepdog festival where we met about 75 other sheepdogs and their owners. It was CRAZY! (But that's another story...) On the way out, we stopped in Nauvoo so Sammi could go through a session in the Nauvoo Temple and then we headed to St. Louis. Because I had to get back for the last week of school and Sammi had classes, she and I flew home while Bob, Maddi, and Charlie drove home. Of course, another stop in Jamesport was a necessity...supposedly to purchase the footstools for the glider rockers. Well, Jake being the amazing salesman he is, talked Bob into buying to two Adirondack chairs because they could "fold up flat so we could take them to the beach." (Hello...have you been to Utah??) Anyway, they came home with these two little treasures for a really great price.
They've been a fun addition but again, took a beating in the weather.
Last year, I got the wild and crazy idea to paint them really fun colors. However, Bob wasn't really big on the idea (he liked the natural wood) and we couldn't figure out how to paint them the colors I wanted with regular latex or oil-based paint. The project was postponed for yet another year and the wear and tear took its toll.
This year when I approached Bob, he was totally for it! YIPPEE!!! However, we still couldn't figure out how to paint them with latex and since we didn't have any experience with spray paint, we didn't think it would work.
WRONG!!!!!! I asked our cute and INCREDIBLY creative friends, Cindy Hawkes and her adorable daughter Emily Fillerup, how they had done their crafty restoration and painting projects. They sent me to the FABULOUS website "
All Things Crafty." The author is a cute mom from St. George who LOVES home-decorating but is always looking for the most inexpensive way to do it. WOW!!! What a find!!!!! I've become completely addicted to the blog and have read almost every post...some of them
multiple times.
My favorite posts are her
PAINTING 101 tutorials and explanations. WOW! So grateful for someone who has done all the research, experimenting, and trial-and-error then shared her wisdom with the rest of us.
So...the project began. We started with this six year old
incredibly weathered Amish chair...
After Zack helped me sand it down (OK...Zack did it all...), with a little help from Kenzi's nephew Daxton,
we primed them. Brooke (All Things Thrifty) HIGHLY recommends KILZ brand primer and I can see why. It covers everything but still took 2-3 coats to completely cover the chair. An added benefit was it also seals the wood so we prevent further weathering. YAY!!
I found this at both Walmart and Home Depot. Walmart was cheaper but had a limited supply...Home Depot would price-match. (Be sure to carry your receipts with you so you can take advantage of this sweet little bonus!) If I remember correctly, it took about four cans to cover the chair and the base.
After the priming, the fun began with painting. My first wacky color was Krylon's Watermelon.
Here's a side note: DO NOT USE CHEAP, DOLLAR-A-CAN SPRAY PAINT! Brooke totally warns against using it...you don't end up saving money because you have to use so much to get the kind of coverage you want. Walmart sells Krylon; Home Depot sells Rustoleum. Different Walmart stores sell different colors. Be prepared to drive around looking for the perfect color! :) When you find it, you may want to buy an extra can or two to make sure you have enough just in case you need more and have a hard time tracking it down. It took another four cans of this to completely cover the chair. LOVE the color!!!!
Glider rocker #2 had to be the B-E-A-U-T-I-F-U-L Krylon Blue Ocean Breeze! I am completely in love with this color!!
This is one I had to hunt for. When I found it, I bought out the entire supply!!! I wanted to make sure I had enough for future projects in case it's hard to find again.
The Adirondack chairs proved to be a bit more of a challenge. Since they are able to fold (to take to the beach...;) ), there were a lot more nooks and crannies to make sure we got covered. I wanted a really beautiful bright lime green but could not find anything in Krylon. As I shopped at Home Depot, I found they had Rustoleum in a fabulous Key Lime. SOLD!!
 |
The color on this picture
doesn't do it justice.
It's MUCH "lime-ier"!! :) |
Brooke really loves Krylon because of the coverage and trigger but I've found I really, really LOVE Rustoleum 2x Coverage. The trigger is nice on my finger (when you're spray painting a LOT, your index finger tends to DIE!!! (Mine is still numb in spots from two weeks ago!!) The spray pattern of Krylon is quite broad and you can adjust the nozzle horizontal or vertical. The Rustoleum has a much more narrow pattern but it's intense! Seriously, you need almost half the amount you need of Krylon!! (We used just less than 2-1/2 cans on the whole chair!!) I love, LOVE, LOVE the finished color of this one!!
Next, I wanted an orange chair (we kind of had a "theme" going on with the chairs. Mine is pink, Bob's is blue, Sammi's is lime green...of course, and Maddi's is orange...of course. The married kids think they need their own chairs too but we'll have to take another trip to Jamesport to get those--not a problem except it's not in the budget. :( I did find some at Home Depot for $30 but they aren't Amish. A decision is in my future...) I found the perfect Pumpkin Orange from Krylon and was excited to get using it.

After priming, of course, Bob and I started to paint. OH. MY. GOSH!! Can you say NIGHTMARE!!!???? The other colors had all gone on complete meaning you could instantly see the totally covered color. Not so with this one!! It went on transparent and kind of runny. We thought we had a bad can so tried another one...same deal. We kept at it and five cans later, we had only covered the top side of the chair!!!!!!!!! We gave up for a few days as we tried to figure out what to do: go buy another 4-5 cans of Krylon OR go try to find a comparable color in Rustoleum. The latter choice won out and we found almost a perfect match at Home Depot.
We switched, painted the back/under side in Rustoleum and then flipped it over and put an even cover on the top. All in all, I think we barely opened the third can! (We wanted to make sure the Krylon was completely covered...it ran quite a bit so we had to fix that.) Rustoleum was AMAZING!!!
After painting all the chairs, we decided we would put a coat or two of polyurethane on them to make sure they had the additional protection from the weather and Bob wanted to make sure there was a UV protection in them so the colors wouldn't fade over time. THAT was an expensive purchase...$50 for a gallon!! DO. NOT. BUY. A. GALLON!!!!! We now have a life-time supply of polyurethane!! :P
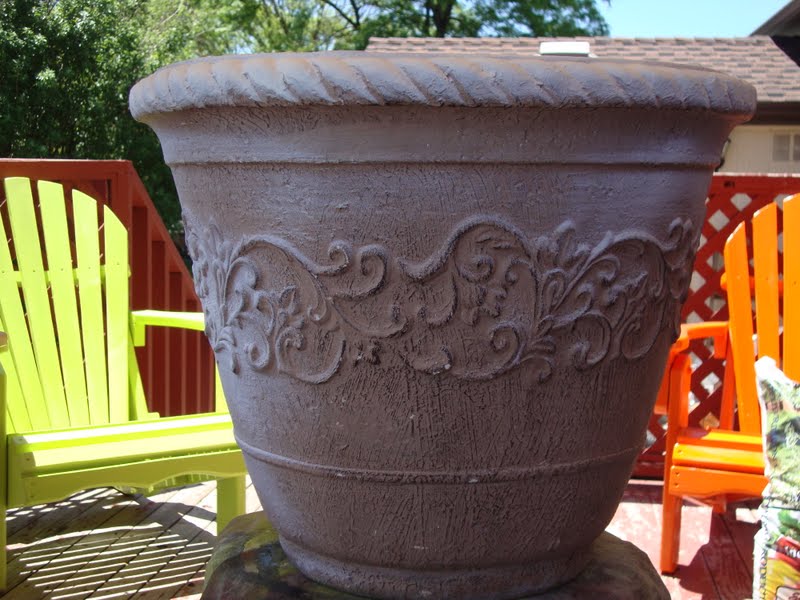
Of course, I couldn't stop with the chairs! After searching around the yard, I remembered I had four flower pots I bought for the weddings but never loved the colors.
Problem solved!! Spray paint!! I primed those puppies, and then decided to paint them to match the chairs.
However, I went a little off and decided I wanted to put one of the pots on the front porch with a mosquito plant in it to help keep the West Layton bird away from the door.
I wasn't prepared to put wild and wacky colors on my front porch so I found a nice, bright red for that one.
The pots have a fun design on them. I wanted that to stand out so back to ALL THINGS CRAFTY for ideas. Of course, I found one...
GLAZING! I was kind of leery of doing this but figured if I didn't like it, I'd be out the money for the glaze and have to prime/paint them again. (NOTE: Brooke recommends Ralph Lauren glaze from Home Depot. They don't carry it any more...at least the Layton store...and only sell Behr or Martha Stewart. Brooke said it was super easy because they mix it for you...not any more! You have to buy the glaze and then get a sample of the color you want the glaze to be and you mix it yourself. LAME!!! But...I did it and it turned out good.) Follow Brooke's great tutorial on glazing and you won't go wrong. I really love the way these turned out!


I found another couple of OLD plastic pots that were kind of a Terra cotta color...YEP! Painted those!! (I decided not to glaze them since there wasn't the fun detail to them. Don't love them as much as the other ones but they're still fun.
After a trip to J&J Nursery, the pots are planted and ready to look fabulous on the deck with the chairs. YIPPEE!!
J&J has these little inserts called "
Ups-a-Daisy" that are FABULOUS!!
They save potting soil, protect the plants from too much water pooling up in the bottom, etc. I only bought three (that's all they had in the size I needed) but I plan to add to the collection next year!
Here's the finished planter projects! I'm really quite proud of our work!!
 |
Front porch--red with the
mosquito plant, a few
petunias and marigolds |
So...how much spray paint did all this take, you ask? Here you go...providing someone didn't sneak a can into the garbage instead of adding it to my "collection."
Yes...that's right, folks...
34 cans of spray paint!! Overall, I know it's cheaper and MUCH easier than using latex paint...there's no way to have gotten that into all the little close areas. The downside, the SMELL and FUMES! I've done this on the deck in the wide open backyard and
still ended up with headaches. I cannot believe kids are dumb enough to "huff" this stuff on purpose for a "high." How STUPID can they get?? It's much more fun to use it for the right purpose and have a pretty deck to enjoy!